Laravel’s scaffolding for both frontend and backend development has evolved in the past couple of version releases. For example, when scaffolding authentication in Laravel 4 & 5, we’d use the good old “make: auth” command; which was quite declarative and didn’t give any other frontend options besides blade. This command pretty much scaffolds a basic authentication system, including routes, views, and controllers necessary for registration, login, and password recovery.
This is convenient, of course, if you intend to use Blade for your views and SSR, but sometimes that’s not the case. Say you intend to build a SPA with your favorite Javascript library, but still want all the goodness of Laravel.
Until Laravel 5.3, Blade was the go-to option for fleshing out your frontend in Laravel. The support for Vue.js in 5.3 introduced the use of Vue components within your Laravel application, by default, Laravel generated a Example.vue component in the resources/assets/js/components directory. It was up to you to decide whether or not you wanted to use it.
Support for using React was introduced in version 5.5, by allowing you to use the Artisan preset command to remove or set what frontend scaffolding preset you prefer.
php artisan preset reactorphp artisan preset none
This flow was discontinued in later versions, precisely version 6.x.

The replacement?
In Laravel 6.x, the laravel/ui package was introduced to make scaffolding Javascript frontend apps in Laravel easier, with support for Vue, React & Bootstrap. It’s pretty straightforward to set up (although this isn’t the route we’d be taking.). You can check the official documentation to learn about scaffolding with the Laravel/UI package.
This flow was also discontinued in version 8. It however is backward compatible, which means even though you’re on version 8 of Laravel, you can still scaffold a vue app using the Laravel/UI package.
The replacement?
Laravel Starter Kits
These are the currently supported scaffolding options…if they don’t change it with the next major release. Here, there are two options for scaffolding:
With Laravel Breeze, what the Laravel team did was to isolate the popular “make:auth” command into a separate package, only this time the generated Blade templates are styled with Tailwind CSS as opposed to Bootstrap that was formerly used. Since we aren’t dealing with Blade, this option doesn’t apply to us right now.
The second option; Laravel Jetstream provides us with two options for scaffolding — Livewire + Blade or Inertia + Vue. No, we’re not going the Jetstream route either, why?
It’s bloated.
What we want is a Laravel + Vue setup in its barest minimum, something like what you get when you scaffold a vue application with the vue CLI.
Now we know the options we have, what we want, and why we want it. Let’s get started.
Getting Started
First, be sure your Laravel cli is up to date. For some reason, this error comes up for outdated versions.

Update your Laravel version with:
composer global require laravel/installer

Next scaffold a Laravel application:
laravel new laravel-vue-minimal

Once that’s done, open up the project in a code editor, open the package.json file, find and replace every instance of npm with yarn. You can ignore this step if you want to keep using npm. We’re only doing this so we can install packages with yarn instead of NPM, a decision that’s mostly based on preference.

Your script object should look like this (Some unedited parts are omitted):
"script": {
    "dev": "yarn run development",
    "watch": "yarn run development --watch",
    "watch-poll": "yarn run watch --watch-poll",
    "prod": "yarn run production",
}
if left unchanged it should have npm commands only:
"scripts": {
    "dev": "npm run development",
    "watch": "npm run development --watch",
    "watch-poll": "npm run watch --watch-poll",
    "prod": "npm run production",
}
Next, we’ll install the packages by typing the yarn command in the terminal:
yarn
or using npm
npm i
We also need to install some required packages as dev dependencies.
yarn add -D vue vue-template-compiler vue-router vuex sass sass-loader
or using npm
npm install --save-dev vue vue-template-compiler vue-router vuex sass sass-loader
Vue Setup
Let’s create a basic Vue folder structure, which would live inside the resources/js folder. Our folder structure would look something like this:
js/
  - Components
  - Mixins
  - Pages
  - Router
  - Store
  - Styles
  App.vue
  app.js
  bootstrap.js
You should have something like this now.

Next, we’ll set up Vue-Router.
Within the Router folder create two files “routes.js” and “index.js”. In the routes.js file, we’ll set up an array of routes and export it.
const routes = [
  {
    path: '',
    component: () => import('../Pages/Home.vue'),
    name: 'home'
  },
  {
    path: 'about',
    component: () => import('../Pages/About.vue'),
    name: 'about'
  },
]

export default routes;
Here we’re defining the home and about routes and mapping them to their respective components - Home.vue and About.vue (which we’ll create in a bit). Next, We’ll set up a Vue Router instance in the index.js file (inside the Router folder) and export the instance.
import VueRouter from 'vue-router';
import routes from './routes';

const router = new VueRouter({
  mode: 'history',
  routes
})

export default router;
Up next, Vuex.
We’ll set up a Vuex store, add a “count” state property, and one mutation that we’ll commit later to update the count property. Within the Store folder, create an index.js file and set the Vuex store up like so:
import Vue from 'vue';
import Vuex from 'vuex'

Vue.use(Vuex);

const store = new Vuex.Store({
  state: {
    count: 0,
  },
  mutations: {
    INCREMENT(state) {
      state.count++
    },
  },
  actions: {}
})

export default store;
If you’ve worked with Vuex before, this should look familiar. If not you can check the documentation.
We can now set up our entry file, this is equivalent to the main.js file you get when you generate a vue application with vue-cli. We’ll find this entry file in ./resources/js/app.js. Here we should find an almost empty file with bootstrap.js import at the top. Leave the import as-is, we’ll set up our Vue instance below it. Import the Vuex store and vue router instance into the app.js entry file then pass it into the Vue instance.
require('./bootstrap');

import Vue from 'vue'
import VueRouter from 'vue-router';

import router from './Router/index'
import store from './Store/index';
import App from './App.vue'

Vue.use(VueRouter)

const app = new Vue({
  el: '#app',
  router,
  store,
  components: { App }
});
At this point, we can set up the all components required. The App.vue is the entry component like you might have seen in our vue instance setup, because of that we’ll have the router-view component in here.
<template>
  <div class="app">
    <Navbar></Navbar>
    <router-view></router-view>
  </div>
</template>

<script>
import './Styles/app.scss'

export default {
  name: 'app',
  components: {
    Navbar: () => import('./Components/Navbar.vue')
  }
}
</script>
Add a Navbar.vue component in the js/Components directory, since we already imported it in the App.vue component. It’ll look something like this:
<template>
  <nav class="navBar">
    <ul class="navBar__link">
      <li><router-link :to="{ name: 'home' }">Home</router-link></li>
      <li><router-link :to="{ name: 'about' }">About</router-link> </li>
    </ul>
  </nav>
</template>

<script>
export default {
  name: 'navbar'
}
</script>
We’ll style this later.
In the Pages folder we’ll add the About.vue component and the Home.vue component respectively. (We already used them in our route.js file).
About.vue
<template>
  <div class="about">
    <h2>
      About Page
    </h2>
  </div>
</template>

<script>
export default {
  name: 'about'
}
</script>
Home.vue
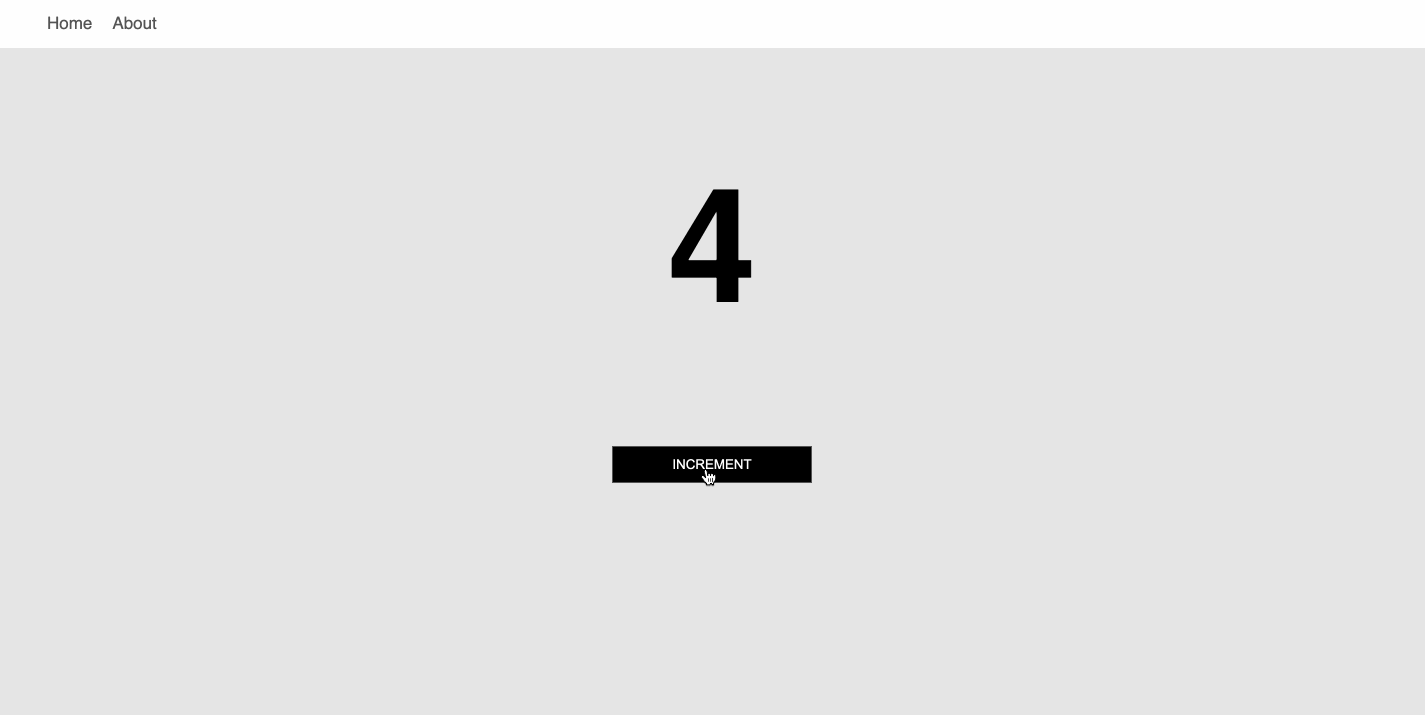
<template>
  <div class="home">
    <img class="logo" width="100" src="logo.png" alt="">
    <h1>
      {{ count }}
    </h1>
    <button class="btn" @click="$store.commit('INCREMENT')">INCREMENT</button>
  </div>
</template>

<script>
import { mapState } from 'vuex';

export default {
  name: 'home',
  computed: {
    ...mapState({
      count: state => state.count
    }),
  }
}
</script>
In the Home component, we’re using the mapState helper to get the count value from our state object. Then we’re committing the “INCREMENT” mutation when the button is clicked. We’re also showing the count value within the h1 tag.
Next, we’ll style our components. Create the app.scss file within the Styles directory (We already imported this in the App.vue file).
Note: We’re mostly doing this for aesthetics, the point of this walkthrough is in the setting up of Vue from ground up in Laravel, so feel free to style your components however you want.
We add some styling to the body:
$font-color: #555555;

body, html, #app, .app {
  padding: 0;
  margin: 0;
  background-color: #e6e6e6;
  text-align: center;
}
Below that we style the h1 tag and navBar class.
h1 {
  font-size: 10em;
  margin-top: 0;
}
.navBar {
  padding: 5px;
  background-color: #FFF;
  &__link {
    display: flex;
    margin: 0;
    li {
      margin: 10px;
      list-style-type: none;
      font-size: 17px;
      a {
        text-decoration: none;
        color: #555555;
      }
    }
  }
}
And Finally, we style the button:
button {
  padding: 10px;
  background-color: #FFF;
  border: 1px solid $font-color;
  color: $font-color;
  cursor: pointer;
  outline: none;
  width: 200px;
}
button:hover {
  background-color: #000;
  color: #FFF;
}
The entire app.scss file should look like this:
$font-color: #555555;

body, html, #app, .app {
  padding: 0;
  margin: 0;
  background-color: #e6e6e6;
  text-align: center;
}
h1 {
  font-size: 10em;
  margin-top: 0;
}
.navBar {
  padding: 5px;
  background-color: #FFF;
  &__link {
    display: flex;
    margin: 0;
    li {
      margin: 10px;
      list-style-type: none;
      font-size: 17px;
      a {
        text-decoration: none;
        color: #555555;
      }
    }
  }
}
button {
  padding: 10px;
  background-color: #FFF;
  border: 1px solid $font-color;
  color: $font-color;
  cursor: pointer;
  outline: none;
  width: 200px;
}
button:hover {
  background-color: #000;
  color: #FFF;
}
Our work here is done. Now we have to make sure Laravel is conscious of our vue setup.
Laravel Setup
We’ll update the welcome.blade.php file within resources/views. This is the entry file that Laravel automatically creates when you scaffold a new Laravel project. Delete all you have there and Update the content to this:
<!DOCTYPE html>
<html lang="en">
<head>
    <meta charset="UTF-8">
    <meta name="viewport" content="width=device-width, initial-scale=1, shrink-to-fit=no">
    <meta http-equiv="X-UA-Compatible" content="ie=edge">
    <link rel="shortcut icon" href="logo.png" type="image/x-icon">
    </script>
    <link rel="stylesheet" href="{{ mix('css/app.css') }}" />

    <title>{{env('APP_NAME')}}</title>
</head>
<body>
    <div id="app">
        <app></app>
    </div>

    <script src="{{ mix('js/app.js') }}"></script>
</body>
</html>
Finally, we’ll update the web.php file within the routes folder, and set a catch-all route. This is similar to your .htaccess rules when you deploy a Vue app to a static host. The catch-all route should look like this:
<?php

use Illuminate\Support\Facades\Route;

/*
|--------------------------------------------------------------------------
| Web Routes
|--------------------------------------------------------------------------
*/

Route::get('/{any?}', function() {
    return view('welcome');
});
That’s it.
From here you should run Laravel-mix to build the vue app, and start your Laravel server.
yarn run watch
Start the Laravel server:
php artisan serve
If everything went right, you should be able to view the vue (no pun intended) app running on port (8000).
Too Lazy to go through the entire set up yourself?
Check out the Laravel-Vue-Minimal repo, it’s a minimal scaffolding for Vue and Laravel, pretty much everything in this walkthrough.
Cheers ☕️